Wednesday, July 29, 2009

Symbolism


"Sorrow can be alleviated by good sleep, a bath and a glass of wine...for it is written that wine makes glad the heart of man."
-St. Thomas Aquinas

Saturday, July 25, 2009

Sweet Potato Fries


Oh, hello, tasty and nutritious nosh. You health-conscious readers out there are not going to believe this, but did you know that a small bowl of sweet potato fries is only 90 calories?

But wait. This gets better. Just take a guess at how many calories there are in a large serving of traditional french fries.

Brace yourselves.

Approximately 600!!!

Yep, you heard it here. You can eat six whole bowls of sweet potato french fries and still consume fewer calories than if you eat just one bowl of regular french fries. You do the math.

My sweet potato fries are baked instead of fried but still pack tons of deliciousness with a surprising balance of savory and sweet (through using both salt and cinnamon to flavor them). I made a small batch for a late afternoon snack and sat happily on my couch munching away until my bowl was totally empty. I felt pretty sorry for my roommate and her boyfriend when they emerged from an afternoon siesta, proclaiming "Wow! What smells so good?!," and I had to tell them that all of the sweet potato fries were gone. Whoops.

Now that I have (hopefully!) convinced you on the merits of this snack, you need to know how to make them. Enough babble on my part.

To make 1-2 servings, you need:

-1 medium sized sweet potato (about the size of an adult fist)
-extra virgin olive oil
-salt
-cinnamon
-butter or butter spray (for greasing baking sheet)

Preheat oven to 375 degrees.

Start by slicing your sweet potato in half and then do your best to slice the whole thing into 1/4 inch thick "logs." This does not need to be perfect by any means, but the fries will cook more evenly if all of the pieces are similar in shape and width.

Lightly grease a baking sheet with butter or butter spray, or, line with parchment paper. Spread your sweet potato pieces onto the baking sheet so none are overlapping. Drizzle with olive oil (about 2 tablespoons). Sprinkle generously with salt and cinnamon. I did not measure the salt and cinnamon, but if I had to estimate, I'd say it was about a heaping teaspoon of each. Bake in the oven for about 15-17 minutes, then remove the baking sheet and flip all of the pieces over. Re-sprinkle with salt and cinnamon and bake for another 15-17 minutes.

Remove from oven, transfer to plate or bowl and enjoy immediately. Fries should be fairly crisp and crunchy on the outside and softer on the inside.

HAPPY SNACKING!

Breaded Chicken Cutlets with Salad Fresca


This dish can be made in 9 minutes. I timed it when I made it for lunch today. Even better, every single ingredient is probably already in your refrigerator or pantry, and if not, is very easy to find. You could easily buy all ingredients needed for under $10! Quick and cheap? What are you waiting for? Stop making excuses for why you don't cook and go...cook! It's fun, I promise!

To make Breaded Chicken Cutlets with Salad Fresca, you need:

-2 boneless, skinless chicken breasts
-1 cup store-bought, Italian herb flavored breadcrumbs
-1 egg
-1 cup extra virgin olive oil
-1 large cucumber
-1 cup grape or cherry tomatoes
-1/2 small red onion (about 1/4-1/3 cup chopped)
-salt and pepper

To make the Salad Fresca, peel and chop the cucumber into 1/2 inch cubes. It is easiest to cut it length-wise first, then in half, then in quarters and finally, chopped. Next, cut each tomato in half and then in half again. Take your red onion and finely chop into little bits. Transfer cucumber, tomato and onion onto your serving dish (a large, deep plate does the trick) and spread out. Generously drizzle with olive oil and sprinkle with salt and black pepper. Set aside.

To make the Breaded Chicken Cutlets, begin by pouring about 1 cup of extra virgin olive oil into a large skillet. Turn heat on medium high heat. Next, crack the egg into a shallow bowl and pour the breadcrumbs into another. Take your chicken breast and dip into egg. Then, roll it in the breadcrumbs until fully coated. CAREFULLY, place cutlet into heated oil (the hot oil will splatter if you drop the cutlet in instead of placing it, which translates into very very hot oil potentially splashing on your skin. Not fun). Repeat process with second cutlet. After about 2 minutes, flip cutlets with a spatula. The cutlets should cook no more than 2 minutes on each side and will look browned and crispy when done.

When chicken is cooked, remove from skillet using the spatula and let any excess oil drip off into skillet for about 20 seconds. Serve immediately on the plate with salad fresca. Serves 2 (and hits the spot for a delicious light lunch!)

Tuesday, July 21, 2009

Food for thought (And Yummy Things to Look At!)


Butternut Squash Risotto & Shrimp


So, apparently I am on a shrimp kick. I've had shrimp three days in a row now and could easily eat it for another three days. This is nothing new for me. At holiday parties, I hover above the shrimp cocktail.

Ironically, I crave cold shrimp in the winter and hot shrimp in the summer. What can I say, my taste buds tend to do their own thing. Can't control 'em!

This summer, I have been eating shrimp atop a variety of pasta dishes and tonight, on butternut squash risotto. My friend Mary came over to my apartment and I wanted to cook a light summer supper for us to enjoy with a bottle of white wine. Shrimp with risotto sounded like a solid match and according to Mary (and me!), it was a good choice.

Now, I must be honest here. I did not make the risotto from scratch. I had a busy day and butternut squash risotto called for like, 20 ingredients that I had little desire to hunt down (my wallet thanked me for this decision). I used a box of risotto with flavor already "built in," so to speak. I just followed the directions on the box and watched it simmer and thicken on the stove. To salvage a little bit of my dignity though, I boiled and pureed about 1/2 cup of fresh butternut squash and mixed that in with the risotto before serving. It tasted just lovely.

The shrimp took four minutes to cook (about two minutes on each side) in a few tablespoons of extra virgin olive oil and salt & pepper. I piled it on top of the risotto and served the dish aside a citrus avocado salad (avocado and grapefruit cubes).

One bottle of wine and two empty serving dishes later, Mary and I were a couple of happy ducks, ready to move on to the chocolate brownie bites and fresh strawberries...

Sunday, July 19, 2009

e.e. cummings & boysenberry jam


It is 1:16am and I am contently sprawled on my couch with a complete works of e.e. cummings, ciabatta toast with cream cheese & boysenberry jam, and a piping hot cup of tea.

Life does not get much better than this.

buona notte, world!

Friday, July 17, 2009

Linguine with Tomato, Asparagus, Button Mushrooms & Baby Shrimp


Ahh, pasta. Pasta never fails to delight my belly. And this pasta, with all of its bright, summery and delicious mix-ins caused me to sit perched on my kitchen counter and eat it out of the serving bowl.

Well, just a bite or two. I made it for an evening of catching up with my good friend (and soon-to-be roomie!), Elizabeth.

I did not follow a preexisting recipe. I just trusted my gut and assembled a simple dish that I will most likely now be making weekly.

That's the spirit of this post. I want to encourage you all to go make something without a recipe. Start with a basic if you like, such as pasta or rice (or anthing else you enjoy that can have lots of varied ingredients added to it), and then, just start creating. In my experience these past few months in the kitchen, I have found that the best dishes are created when I do just that; create.

Recipes are good, and I follow them often. However, I am also beginning to see that there is a a fine line between someone who relies on recipes and someone who invents them: the former is a cook. (And there is certainly nothing wrong with that). But the latter, well the latter is someone quite special. He or she is a chef. An artist.

* * * * * * * * * * * * * * * * * * * *

To make Linguine with Tomato, Asparagus, Button Mushrooms & Baby Shrimp, you need:

-2/3 box (about 12 oz) Linguine pasta
-1/2 lb raw baby shrimp, peeled and deveined
-1/2 cup cherry or grape tomatos, halved
-1/2 cup white button mushrooms, chopped
-15-20 asparagus (heads only, not the stocks)
-2-3 cloves garlic, chopped
-salt
-pepper
-olive oil
-grated parmigiano cheese

Bring 8 cups of lightly salted water to a boil in a pasta pot. While you are waiting for the water to boil, heat about 3 tablespoons of olive oil in a large skillet over low heat. Chop garlic and add to oil. Add shrimp (tail shells removed), mushrooms, asparagus heads and tomatos. Reduce heat to simmer. Once pasta water is boiling, add linguine. The pasta should cook for about 9 minutes. After about five minutes (or, when the pasta only has about 4-5 minutes left to cook), turn up the heat on your shrimp and vegetables skillet to high (from simmer) and add another few tablespoons of olive oil (be generous). Add salt and pepper to taste (I used a couple teaspoons of each). Sautee all ingredients, mixing frequently with spatulua. Tomatos may explode (this is fine...it adds great color!). Shrimp should look pink, mushrooms lightly browned and asparagus slightly darker green than when raw.

When pasta is cooked, drain and return to pot. Pour shrimp and vegetables over pasta and add another few tablespoons of olive oil. (Just FYI, when it comes to olive oil, salt and pepper when cooking, I don't really measure. I eyeball it. The measurements here are estimates of about what I think I added). Stir in 1/4 cup shredded parmigiano cheese and mix well. Serve immediately.(Serves 4).

Scramblin' Around


I did a little experiment tonight. I was in a strange mood and decided to make a dish using the first five ingredients I saw when I opened my fridge.

They were:

-Eggs
-Tofu
-Red onion
-White button mushrooms
-Parsley

Surprisingly, all of these ingredients happen to go well together. I got pretty lucky with the randomness factor. Aside from the tofu, the other four foods are usually standard mix-ins for an omelet. And, after I tasted my random scramble, tofu will now be standard too.

I can imagine at least half of you wrinkling up your noses in distaste. Tofu?? No way. I know, I know...you either love it or you refuse to try it. But, if you can find it in yourself to trust me, I actually think that this scramble is a decent way to warm up to tofu if you are in that latter category. It blends well with the other ingredients and is almost the same texture as the scrambled egg. (FYI: I also added some salt and pepper to my scramble...I counted those as "freebies" in my experiment).

Give the tofu a try. The worst that can happen is you waste five minutes of your day scrambling some eggs.

Tuesday, July 14, 2009

Lemon Blueberry Crumb Bars


Holy Moly! Platter has been licked clean, my friends.

If you are like me and stock up on things when they go on sale (4 quarts of blueberries for $5! ), then this recipe is for you. Actually, only if you stocked up on, well, blueberries. If you do not happen to have blueberries in your refrigerator, then drop whatever it is you are doing at the moment, go to your local farmer's market or grocery store and buy a few containers worth, because these crumb bars are to die for.

And look at how pretty they are. I think fresh blueberries are just the loveliest shade of blue, and when heated, the most succulent shade of purple. They beg to be savored. Mmmm, Mmmm, Mmmmmmm.

Okay, so clearly I have obsession issues. But, hey! Don't judge. You will too after you make this recipe. (I found the original recipe on smittenkitchen.com, but tweaked a few things to make it my own).

To make Lemon Blueberry Crumb Bars, you need:

-1 cup white sugar
-1 tsp baking powder
-3 cups all-purpose flour
-1 cup (2 sticks) butter
-1 egg
-1/4 tsp salt
-The zest and juice of one lemon
-4 cups fresh blueberries
-1/2 cup white sugar
-4 tsp cornstarch
-1 Tbsp dark brown sugar

Preheat oven to 375 degrees. Grease a 9 x 13 (or similar-sized) baking pan. In a medium bowl, mix together the baking powder, flour and first cup of sugar. Add in the salt and lemon zest (but not the juice). Crack in the egg and add butter. (I found it worked best to cut the butter into chunks, mash it with a fork and then roll up my sleeves and get down and dirty with the batter). Mix all ingredients together thoroughly. Dough will be crumbly. Spread a layer of dough into the baking pan, about 1/2 inch thick.

In a different bowl, stir together the cornstarch, 1/2 cup sugar and the juice of one lemon. This will make a sugary syrup-like substance. Pour in the fresh blueberries and mix so blueberries are coated with syrup. Do not mash. Pour the blueberry mixture over the dough in the pan. Then, layer the rest of the dough on top of the blueberry layer (you do not need to fully cover the blueberries and definitely don't need a full 1/2 inch-thick layer of dough on top. This layer should be more crumbly, and not patted down. Sprinkle the brown sugar on top and bake for about 40 minutes, or until golden brown.

Remove from oven and let cool completely in the refrigerator. The bars cut better after being fully chilled.

Now, for the best part:

Open mouth.
Consume.
Delight in seeing blueberry-stained lips, teeth and tongue.
Yea!

Monday, July 13, 2009

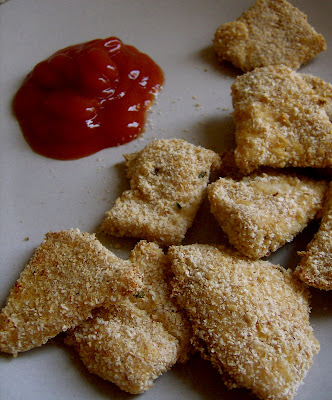
Chicken Nuggets


Quick, easy, and way healthier than the ones you buy at McDonald's (but just as tasty!) These are great for an afternoon snack, so if you're hungry, get cookin'!

To make 20 chicken nuggets, you need:

-2 boneless, skinless medium-sized chicken breasts
-1 egg
-1 cup store-bought breadcrumbs, plain
-1 tsp oregano
-salt & pepper
-any other seasoning you like (mixed Italian herbs are tasty)
-olive oil spray (optional)

Preheat oven to 400 degrees. Cut chicken breasts into small chunks ("nugget" shaped).
Crack egg in small bowl and lightly beat with fork. In a second bowl, mix the breadcrumbs, oregano, salt, pepper and any other seasoning you like. Take each nugget and dip in egg making sure to cover completely. Then, roll nuggets in breadcrumb mixture until fully coated. Place on lightly greased baking sheet and spray each nugget with a little olive oil. This will make the nuggets extra crispy...and trick you into thinking they are fried! (By the way, if you skip this step, the nuggets will turn out fine). Bake for 18 minutes, cool, and serve with ketchup or dipping sauce of your choice. These will go fast, so get 'em while they last!

Sunday, July 12, 2009

The Healthy & Fit Algorithm

A re-posting from "Zen Habits," Leo Babauta's mind-blowing blog I introduced in June. As the following post states, "Getting fit is about two things: eating right, exercising, and doing those two things consistently!" So, happy reading :)

The Healthy and Fit Algorithm


Getting healthy and fit can be a ton of fun.

Editor’s note: This is a guest post from Adam Gilbert of MyBodyTutor.com.

Since I’ve quit my job, I’ve helped countless people change their lives for the better via one word: Consistency. And I want to help you too!

My idea for this post was to make a rule based post. Call it the healthy and fit algorithm. In the most general sense, an algorithm is a set of detailed instructions which results in a predictable end result.

Follow them consistently and you’ll be well on your way to getting in shape!

Remember: Getting in shape is about 3 things. Eating right. Exercising. And doing those two things consistently! Of course, that’s easier said than done but it’s the truth. Getting into shape is not rocket science!

Let’s get right into it.

Food:

  1. Eat every 3-4 hours. By doing this you’ll keep your blood sugar stable which is the key and also turn your body into a fat burning machine. Think of your metabolism like a camp fire. If you don’t want a camp fire to burn out, you have to constantly add wood and logs to it.
  2. Never let yourself get hungry! This serves many purposes. It keeps your blood sugar stable, keeps that fire burning, but also when you’re very hungry it’s extremely hard to make good decisions!
  3. Eat only complex carbs. Refined and simple carbs will spike your blood sugar which is exactly what we don’t want. Eat whole wheat bread instead of white, whole wheat pasta instead of regular, brown rice instead of white, etc.
  4. Eat lean proteins! Depending on your lifestyle stick with proteins like chicken, eggs, and fish. Beans, nuts, legumes, and lentils are also awesome choices.
  5. Veggies! You can never have too many vegetables. I say everything in moderation. Even moderation. Not with veggies!
  6. Fruit is nature’s candy. Eat fruit when you are craving something sweet. You’ll be amazed at how little you miss junk food!
  7. Drink lots of water. No need to get obsessive but try to drink a glass of water with each meal, and in between every meal. Your body will love you for it.
  8. Don’t eat 2-3 hours before bedtime. And if you must - make it a protein rich snack.
  9. Don’t eat until you’re stuffed. Instead, eat until you’re satisfied. You should feel like you can exercise right after you eat.
  10. Eat slowly. The best way to eat until you’re satisfied is to savor every bite. The slower you eat the more full you’ll feel. It takes 20 minutes for our brain to realize we’ve eaten. We don’t need nearly as much food as we think we do!
  11. No such thing as perfection! No one eats perfectly. We’re not robots! Remember: It’s what we do most of the time that generates most of our results! If you eat unhealthy make your very next meal healthy! No big deal. Just make that U-Turn! Every meal, every healthy choice, every compromise, really and truly makes a difference. Your body never lies!
  12. Am I hungry? Or am I eating to change the way I feel? Ask yourself this before you eat. If the answer is yes, you’re eating for the wrong reasons! Physical hunger comes on gradually. Emotional hunger comes on suddenly.
  13. Focus on eating foods that make you feel good. What does this mean? I like ice cream and cookies as much as the next guy. But I hate how it makes me feel afterward. Tired, lethargic, unfocused, etc. Instead, focus on foods that make you feel good before, during and after you’re done. You’ll never regret making a healthy choice!

Exercise:

  1. Do it 4 times per week for at least 30 minutes. Seriously, doesn’t matter. Basketball, jogging, weights, push ups, etc. Unless you have a specific goal just make sure to get it done!
  2. The two day rule! You can’t miss 2 days of working out in a row. You can skip one day. But not the next!
  3. Don’t let the “Exercise Monster” build up. When I don’t do laundry for a while it becomes what I like to call the ‘Laundry Monster’. It builds up in my mind and I avoid doing it at all costs. Until finally, I have to. And it’s never as bad as I think it’ll be! Don’t let it happen to you. Follow the two day rule!
  4. Don’t focus on exercising at a certain time. Just focus on making time to exercise!
  5. Make it fun! Listen to music; join a nice gym; etc. Bonus: If you love working out with music as much as I do, only listen to your favorite music while you workout. I’ve actually exercised just to listen to my music.
  6. Focus on how you want to feel. We always feel energized after we workout. Yet, we usually skip exercise when we’re feeling tired! Remember: Exercise will give you energy. Want more energy? Exercise more!

Exercise and eating right pays off big in your quality of life! If you need to spend extra money on groceries, a gym membership, trainers, etc., do it!

Warren Buffet said it best. “The best investment you can make is in yourself!”

And if you’re able to follow these rules consistently you’ll be well on your way to getting in shape!

Fresh Strawberry Cake


Not much explanation needed for this one. If you like the color pink (and even if you don't), then make this cake. It's a perfect dessert to eat during the summer when strawberries are in season and all you want is something light, fresh and oh so sweet. I plan to make it again this fall as a treat for my Pre-Kindergartners when school starts up again. Somehow, I have a feeling it will be a hit with 4 and 5-year-olds!

To make the cake, you need:

-1 box white or yellow cake mix (I used white)
-1 box strawberry jello mix (powder)
-4 eggs
-1 cup vegetable or canola oil
-1/4 cup water
-4-5 fresh strawberries, sliced and mashed (0r pureed, I used the blender for about 30 seconds)

Preheat oven to 350 degrees. Combine cake mix and dry jello mix together in a large bowl. Beat eggs separately and add to bowl. Add oil, water and mashed strawberries. Mix all ingredients well and transfer batter into two, well-greased round baking pans. Bake for 30 minutes or until a fork/toothpick comes out clean. Let cakes cool for about 5-10 minutes and then remove from pans and cool on a plate or rack.

To make the deliciously rich strawberry cream cheese frosting, you need:

-3 cups powdered (confectioners) sugar
-1 8oz package plain cream cheese
-1/4 cup butter
-1/3 cup mashed strawberries

Soften the butter and cream cheese to room temperature. Put all ingredients in a bowl and mix together until smooth. If you have an electric mixer with beaters (I didn't), use it to ensure the mixture is smooth and creamy. Or, transfer all ingredients to a blender and press "mix" for about 30-45 seconds (That's exactly what I did and my frosting was great!) For best results, let frosting refrigerate for about 20 minutes before frosting the cake (or, allow cake to cool completely).

Add a few slices of fresh strawberry to the top of your cake and enjoy, enjoy, enjoy! Keep refrigerated if not eaten.

Saturday, July 11, 2009

Mini Crostini with Feta Artichoke Dip & Tomato


I am slightly obsessed with Westside Market's assorted dips and spreads. I am at Bank Street (my graduate school) at least four days a week and Westside Market is my go-to stop for fantastic noshes. The popular gourmet grocery store always has delicious (and abundant!) samples including a dip station featuring flavors such as "Creamy Spinach Florentine," "Goat Cheese with Sun-Dried Tomato" and my personal favorite, "Feta with Spicy Artichoke."

I love the dip because it is so fresh and savory without any unnecessary added preservatives. I decided to try and recreate it because of the simplicity of the ingredients. My version looked and tasted nearly identical to the original which only furthered my admiration of it. Tasty AND simple! I ate it on cute, miniature, crunchy crostini bread ("Petite Toaste", according to the label), topped with fresh tomato slices.

To make the dip, you need:

-1 small block of feta cheese (not crumbled)
-4-5 artichoke hearts, chopped (completely fine to use the canned kind because the juices keep the hearts nice and soft...perfect for blending in with the feta and herbs!)
-1 Tbsp parsley, finely chopped
-1-2 tsp oregano & rosemary (adjust to personal preference)
-1 clove garlic, minced
-1 Tbsp extra virgin olive oil

Combine all ingredients in a bowl, mix well and refrigerate so flavors can permeate together. Serve on crackers, bagel chips, ciabatta bread, crostini...honestly, the dip is sooo good it really won't matter what you eat it on.

Wednesday, July 8, 2009

Egg in the Hole (Or How Not to be a Snob)


I am not a fan of fussy food (at least at this stage of my culinary development). I knew a guy in college who once uttered the following on a Wednesday afternoon in the student lounge: "I am going to the party of all parties tonight on the Upper East Side. Cristal to drink and privilege food, you know?"

No, I didn't know. According to him, "privilege food" equated to caviar, pate...that whole deal.

Fish egg gunk? No thank you. Clearly, I had "not yet developed a sophisticated taste palette" (His words again). Sidebar: the two of us had a tendency to engage in heated debates with one another in political science class...who woulda thunk?!

Anyway, as I was saying, I do not particularly enjoy snobbery in people or in food. What I do enjoy, is good food. Good is a very relative term and I am aware of this. And tonight, for me, good equated to a childhood favorite called "Egg in the Whole."

Egg in the Hole is exactly what it sounds like. You crack an egg into a piece of bread with a center hole cut out of it, and fry it up in a pan. That's it. That's the whole recipe.

I know, I know, it's really difficult to make. You'll slave for hours over this one. Oh, and did I mention how expensive the ingredients are? Just look how elegant it is...so worthy of being served at an upper echelon society party ;)

Monday, July 6, 2009

Foodgasm


This picture is an example of the food they serve in heaven...otherwise known as an artichoke slice from the ever popular East Village pizza shop of the same name: Artichoke. (It is also approximately half a block from my apartment. yeah.).

I won't even attempt to describe the taste of this pizza because I cannot do it justice. However, I will offer this warning: Do not consume if you are not prepared for a food-induced orgasm. But if you are, by all means, go stand in line with all of the other aroused New Yorkers.

Check it out on 14th street between 1st and 2nd ave. I promise it will be the best $4 you've ever spent.

Sunday, July 5, 2009

Whole Wheat Mac N' Cheddar with Broccoli


This dish is my version of "healthy" mac n'cheese (if there is such a thing!). I must admit, when it comes to pasta, I generally go for "the real deal." I like whole wheat bread but never really considered whole wheat pasta. For some pasta dishes, I don't know if I ever will. However for this one, the whole wheat pasta makes for quite a tasty pairing with the homeade cheese sauce and broccoli florets. Moreover, it packs quite the healthy punch.

To make "healthy" mac n' cheese with broccoli, you need the following:

-1/2 pound (1/2 box) whole wheat penne pasta
-1 & 1/2 cups broccoli florets (no stems)
-1 & 1/3 cups milk
-2 Tbsp butter
-1 Tbsp flour
-12 oz sharp cheddar cheese, grated
-salt & pepper to taste
-1 tsp cinnamon

Bring 6 cups of water to a boil in a medium-sized pot. Add pinch of salt. Once boiling, pour in pasta and cook for 8-10 minutes, or until tender. During the last 3 minutes of cooking, add broccoli florets.

In a separate saucepan, melt the butter and add flour and milk. Pour in grated cheese, stir, and reduce heat to low to allow thickening. Add generous amount of salt & pepper and then, (my secret ingredient!) cinnamon.

When pasta/broccoli is done, drain and return to pot. Pour cheese sauce in and mix well. Add a sprig of parsley for garnish (thanks, Em!) and serve immediately. Serves 3.

Saturday, July 4, 2009

4th of July Scones


Happy Independence day! In honor of America's birthday, I decided to make a red, white and blue treat. I give you..."strawberry-blueberry-coconut scones." Yes, the scones are good (very good), yes they are easy and yes they make the entire house smell light and sweet in all of their sugary buttery greatness. I couldn't take the prerequisite photos without stealing a nibble first.

While I made this particular batch in late afternoon, I'll be sure to make the next batch early in the morning and enjoy them with a piping hot cup of tea. Heaven.

To make 4th of July scones (on either Independence day or ANY day), you need:

-2 cups all purpose flour
-1 Tbsp baking powder
-3 Tbsp white sugar
-1/2 tsp salt
-5 Tbsp cold butter
-1/3 cup fresh blueberries
-1/3 cup fresh, ripe strawberries (sliced into 1/2 inch pieces)
-1/2 cup shredded coconut
-1 cup milk or cream (the recipe I was following called for cream but I didn't have any on hand. Milk was absolutely fine).

Preheat oven to 425 degrees.

In a medium sized bowl, mix together the flour, baking powder, sugar and salt. Stir in butter. I started by using a rubber spatula but then rolled up my sleeves and plunged my hands in. I was able to mix the dry ingredients with the cold butter a lot faster this way). Add blueberries, strawberries and shredded coconut. Last, pour in the milk or cream slowly while continuing to mix the batter. The batter should be sticky and doughy (not runny).

On a greased baking sheet, separate the dough into 8-10 "triangular-shaped" piles. (Scones are traditionally triangular in shape, but if you feel like making circles or hearts or squares, go for it. Mine were only triangle-esque). Sprinkle the tops with a pinch of sugar and bake for 15-17 minutes, or until golden brown.

Remove from oven, place in mouth, and feel your taste buds break into their happy dance.

Friday, July 3, 2009

Bite-Sized Potato & Onion Frittatas


Day three of wisdom teeth extraction recovery has left me craving real food (i.e. solids). After a day of eating popsicles, I opened my refrigerator and tried to look past the pudding, cottage cheese and yogurt that all seemed to be staring back at me. No, these would not do. I needed something warmer. Soup? Still liquid. Mashed Potatoes? Better. I was momentarily pleased with myself until I realized I had no potatoes. Damn.

I opened the freezer and did a little digging, for what, I haven't a clue. (Inspiration, maybe?) And, voila!, that is exactly what I found in a wrinkled, half-used bag of shredded hash browns. Frozen hash browns are frozen potatoes, right? Score! I soon realized that frozen hash browns were obviously not going to translate into decent mashed potatoes, so I tried to rethink my dinner plans.

It was at that very moment that one of my Bed, Bath & Beyond kitchen purchases caught my eye: a mini muffin pan! And with that, I had my answer. Time to make mini egg frittatas flavored with hash browns and onion (don't ask where this new idea came from, I can't explain it either).
I checked to make sure I had the staple frittata ingredients (eggs, milk, cheese) and then got to work.

Boy was I glad I did, because fifteen minutes later, my cute, bite-sized frittatas came out of the oven and I tasted a solid for the first time in 72 hours. So delicious, so mini, so flavorful, so wonderful. Make them for breakfast, or if you're like me, for a random nosh at 5:00pm on a Friday afternoon! They are ridiculously easy, ridiculously quick and ridiculously yummy.

To make 12 bite-sized frittatas, you need:

-3 eggs
-2 Tbsp milk
-2 Tbsp grated parmigiano cheese (any cheese will do, but parmigiano gives the frittatas a slightly salty flavoring)
-1/4 cup finely chopped red onion
-1/3 cup shredded, raw hash browns (I popped the frozen ones in the microwave and defrosted them for about 1 minute).

Preheat the oven to 375 degrees.
In a medium sized bowl, wisk together the eggs, milk and cheese. Add in the chopped onions and shredded hash browns. Mix well.
Spray or grease a mini muffin pan with butter or oil.
Pour in the mixture to just below the top of each of the mini muffin tin line (about 1 heaping tablespoon for each).
Bake for 12-14 minutes.
Remove from oven and serve immediately!

*The frittatas should pop right out of the muffin tins and I promise that they will go fast if there are hungry family members or roommates around. These are also great to serve at a brunch or as an appetizer at a party. Or, if you're like me, you'll eat six of them yourself and relish in the fact that solid food is once again gracing your palette :)

Thursday, July 2, 2009

Strawberry Banana Smoothie


I am under house arrest due to the removal of my wisdom teeth yesterday. Knowing that I would be confined to my apartment for at least three days, I went on a bit of a shopping spree in the kitchen department of Bed, Bath & Beyond earlier this week. Item of top priority? A blender. When I left, my cart was filled with a top-of-the-line CuisineArt blender along with about five other appliances/kitchen gadgets. What can I say? Now that I've started this food endeavor, I am unable to resist!

Anyway, aside from looking like a part of the chipmunk brood, I'm feeling pretty good, all things considering. In fact, my mouth pain is so minimal that I am suffering more from cabin fever than anything else. But, I would probably scare a young child if I ventured out of my apartment, so I shall remain here until the swelling reduces.

I am unable to eat solids and therefore unwilling to cook them at the moment (too much temptation). The fresh fruits I bought last week are starting to look a little depressed and I knew I had to either use them up or throw them out. Perfect opportunity to break in my new blender with a simple strawberry banana smoothie.

There are a lot of smoothie recipes out there and usually, I am someone who would just put in some fruit with some ice and call it a day. Well, when you're "sick" and barely consuming anything else, it's more fun (and satisfying!) to add some creamy goodness to the fruit. That's what I did and if you have two minutes and a blender, you should too!

To make the smoothie, you need:

-6-8 large, ripe strawberries (I sliced mine)
-1 peeled banana
-1/2 cup vanilla ice cream
-1/2 cup low fat milk

(The above ingredients will make a smoothie to fill 1 large glass).

Dump ingredients into blender, press "blend," and mix until all ingredients are smoothly blended (about 20-30 seconds). Pour into cold glass and enjoy immediately.